
Microsoft Teams is a communication and collaboration platform that supports peer to peer video conferencing of up to 250 participants. For larger events, up to 10,000 attendees as of this writing, you can use Teams Live Events.
This is a guide to a practical use of Teams Live Events to host your own large event. From my own experience, I will describe what went well and what could go better for future Teams Live Events. This will be a blog post chock full of links & screen shots.
NOTE: Before executing a Teams Live Event, please make sure that running one and writing about it afterwards does not run against your internal company policies on using new technology by consulting with whatever group claims ownership. Internal compliance to standards is a bellwether of a healthy organization.
Every teams live event is segmented into 3 types of users:
- Producers get to control what content (PowerPoint presentation) and what webcam feed (if any) gets shown to the attendees. Producers can be Presenters as well (I was a Presenter as well as a Producer).
- Presenters get to speak about the content.
- Attendees can only listen, and, if the meeting is configured for it, ask questions through the Q&A panel. Because the live event is recorded and buffered, attendees may be witnessing the content at different points in time, and not be in "real time".
To create a Teams Live Event
- Launch Teams (web or exe) and visit Calendar.
- New Live Event from the upper right corner UI

- Fill out the first page for the live event. Pick Presenters from the Invite presenters UI on the right. You can make people Producers here, which may be nice to have as a backup, but too many cooks...Press Next

- Fill out the second page. I prefer "Org-wide", but I think you can segment this where only specific people are attendees.
I also like checking "Q&A" to enable attendees to send questions, and filling out a Support url, Press Schedule. Your Presenters and Producers that are not you will get the email invite.
- Click on the created Calendar invite in Teams. You'll see a "Get attendee link". Copy that and communicate that url to attendees by whatever means you want (outlook meeting, internal company social media post, cleverly crafted interpretive dance with QR codes, ...)

as these urls are long & ugly, I really like using the "CTRL+K" insert link feature to add them to outlook or your internal company social media system, and to create some nice human readable display text. People like seeing something like chickens with pants | google vs a huge wall of url text that causes content to scroll off the bottom.


Done - you've now scheduled your event
Make sure to do "dry runs" of the live event with your other producers and presenters AND SOME VOLUNTEER TEST ATTENDEES, so you develop a good flow. Creating multiple live events leading up to the real deal is, as far as I know, free and easy to do. Practice makes perfect.
On the day of the Live Event
- You can either create a separate "green room" teams meeting for last minute coordination with the other producers and presenters, or you could probably use the live event as a means of coordination.
As producers and presenters join the Teams Live Event, they can speak with each other, but attendees cannot hear them until they press the magic "Start Live" button. - Remove distractions. Mark yourself Do Not Disturb in Teams. Close outlook. Power down Alexa.


To start & run the Live Event
- The Producer should start the PowerPoint presentation. I'd recommend a multi monitor configuration, where you have monitors, from left to right of:
- Presenter View for slide deck - the one that shows presenter notes, the next slide coming up, etc.

- Teams Live Event view - this is where the Producer will send Presenters live, and control what content shows.

- Slide show view - this will be the content you send to the Live Event
Control that monitor here:
- The Producer wants this monitor configuration because you'll be mousing back and forth to the Teams Live Event view and picking Presenters to place in Queue & to send Live. The less distance you have to traverse, the easier. Trust me.
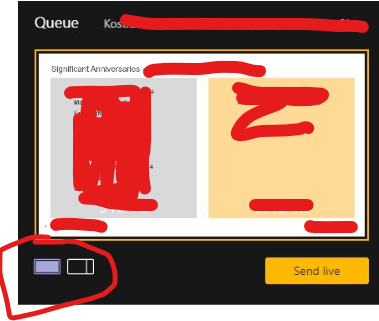
- The Producer makes a choice of displaying either just a presentation, or a presentation and a video feed by picking from this UI under the yellow "Queue" window.

- The Producer will share the presentation by picking "Share" in the lower right corner, and then choosing the Slide show (NOT the presenter view). Select the Content with your mouse in the yellow Queue window, and pick the Content of what you're sharing

If you want to queue a video feed of a presenter, you can do the same. Click the right hand side video feed in the yellow Queue window, and then click a Presenter or Producer. - Click Send live and then Start Live on the live event. You're live to your attendees!
- What shows on the right hand side window for the Live event is what attendees see.


- The Producer moves through the slide show, and places speakers and content in Queue, by clicking at the appropriate place on the left hand yellow Queue window and then clicking on Presenters or Producers below.
Move a Presenter to the live event by Queue'ing them and then pressing "Send live"
I'd recommend sticking with a single piece of shared Content for an entire live event. It's a bit awkward to stop content and reshare new content. - All Producers and Presenters have their audio playing on the live event, so MUTE YOURSELF IF YOU ARE NOT PRESENTING.
Use the attendee chat to do coordination with presenters and producers. Watch that key clicks don't go in the audio feed (more muting!)
- If a Presenter has bad internet and wants to use a dial in number, that is an option.
- Somebody should monitor the Live event Q&A and field questions, promoting them from New to Published or Dismissed as appropriate.

- Lather, rinse, repeat
- Press "End" to stop the Live Event. Once stopped, it cannot be restarted.
- High fives, you're done


After the Teams Live Event
- Visit the Teams Calendar event again to download a copy of the Recording (mp4, you can upload to microsoftstream.com), Q&A report, Attendee engagement report, etc.
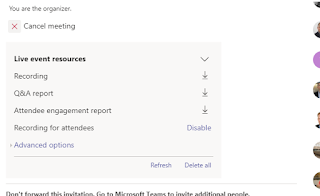
- The attendee engagement report will have an entry for each attendee for each join, so if internet blocks some attendees & they drop, you'll see them join multiple times.

What could have gone better
- We wanted to have intro and exit music and some funny videos. Teams doesn't yet support routing PowerPoint audio as input to the Teams Live Event audio feed. I'm sure we could get some 3rd party software to create a fake audio input device that would "wrap" a microphone and audio out.
Instead, the Producer (me!) leaned his head down next to the speakers so his microphone picked up the audio. For real. - One of the Presenters kept losing webcam feed, so the Producer had to re-queue their webcam as it came back. Luckily, audio was not lost, so this was probably not noticed by anybody.
- As producer, seriously, watch the monitor configuration (details above). The less mouse gymnastics around queueing content and presenters, the better.
Thank you. You've given me a much greater appreciation for the effort and support our producer provides. I liked your section "On the Day of the Live Event." I had overlooked item 2!
ReplyDeleteI currently use Loopback or VoiceMeeter Banana (Loopback is MUCH easier) to get system audio into teams - works great!
ReplyDeleteThanks! I will check those out
Delete