Saturday, May 2, 2020

Little Metrics: Providing Observability in our Projects


Everybody reading this should be familiar with the concept of taking your temperature. When you don't feel well, you (or Mom or Dad) pop a thermometer into your mouth, wait a few seconds, and then take a look. If you're above 98.6° F (37° C, 310.15 K, ...), you may have an infection. Note: I'm not a Doctor (but I play one on this blog).

Recording your temperature is a "little metric" around making a quick judgement around your health, and it's effortless to collect. Well, possibly not effortless for parents of toddlers (I remember those dark days), but you get the idea.

Like taking your body's temperature, we should be able to find and record some effortless "little metrics" around our software projects to make judgements about their health. This is especially true around any project that is:

  • taking more than some tiny number of iterations. 
  • split up into many tasks.
  • worked on by multiple developers.

We demand observability (one of the core -ilities) for the execution of our software, using logging libraries and monitoring services. We should also demand observability on the health of our development efforts, and present that observability in a way that everybody, from individual contributors to C-suite executives, can easily understand.

I'm deliberately wishy-washy about when to apply "little metrics". You'll know where you need it.

My "little metrics rules":
  1. The little metrics collected should be an easy concept for everybody to understand.

    A common example is number of work items (tickets) total for a project, number that are closed, and number that are active. Collecting these metrics requires everybody to be good work item citizens and follow the rules on work sizing and not reopening closed work.

    Other good examples of little metrics are cost, performance (how fast to do the thing(s)), and scalability (how many things are supported simultaneously before the system goes pear shaped).
  2. The little metrics should be small in number.

    If you start collecting and reporting 10 numbers for a project, my eyes are going to start glazing over and thinking about potato chips before you're done. 3-5 numbers sound good.
  3. Collection of the little metrics should be effortless.

    Clicking two urls is good. Clicking one is double plus good.

    The urls should show results in less than 5s. Any more, and you've lost my attention.
  4. Collection of the little metrics should use your source of truth.

    Think about where your source of truth is for tracking the work to be done. Use that. Any use of a denormalized copy of that data (like in an external spreadsheet) will be outdated as soon as you hit File > Save.
  5. Collection of the little metrics should be done in a ceremonial fashion.

    While it's great to collect these metrics via robot, incorporate their collection in your meetings, so that everybody can witness them getting collected. Playing music with their collection is optional.

    Collect and show their graphing over time (the next step) to everybody in your ceremonies simultaneously, and take a short amount of time to speak to what they mean.
  6. The little metrics should be recorded and graphed over time.

    Work tracking systems are great at showing the current state of things. What you want to see is how project health is progressing over time. Every stakeholder, from individual contributor to executive, should be able to easily see these graphs, and understand what they mean.

    If you can record these metrics and graph them over time in your work tracking system, great. If you need to copy them into a spreadsheet, that's fine too. As you're capturing the health state at a point in time, you don't risk outdated data listed in rule 4 above, because changes to the future state don't affect what is happening right now.

    In the example of total, closed, and active, it's very interesting to see a graph like this.

    but you can slice it or dice it however you want: percentages, lines towards 0 (project completion), break out active work as a separate graph, etc. Whatever is most useful to the stakeholders to gauge the "temperature" of a project.

    If total work is growing over time, then the project isn't properly scoped yet (not a pejorative - growth is bound to happen, as the unknown unknowns become known). If closed work stays flat over time, then you can see if you've got enough resources on the project. There's a ton more to be written here, and way out of scope for this blog post.
  7. The little metrics should NOT BE WEAPONIZED.

    I'm 100% serious here. This observability on the state of our projects should be collected and presented in a judgement free manner. This is using data to determine project health. Projects that need love and attention should get love and attention to get them back on track.
I see a lot of metrics in my day to day that can be hard to digest what they really mean - think "can't see the forest for the trees". I'm a firm believer that having a system like these 7 rules in place around project observability will help tremendously in building a shared understanding project health, which further fosters a collaborative development culture.

Wednesday, April 29, 2020

Hosting a Teams Live Event

In these pandemic times with mass WFH (work from home), it is becoming more and more important to understand how to host online events. Physical audiences are turning into virtual audiences, spread throughout the world.

Microsoft Teams is a communication and collaboration platform that supports peer to peer video conferencing of up to 250 participants. For larger events, up to 10,000 attendees as of this writing, you can use Teams Live Events.

This is a guide to a practical use of Teams Live Events to host your own large event. From my own experience, I will describe what went well and what could go better for future Teams Live Events. This will be a blog post chock full of links & screen shots.

NOTE: Before executing a Teams Live Event, please make sure that running one and writing about it afterwards does not run against your internal company policies on using new technology by consulting with whatever group claims ownership. Internal compliance to standards is a bellwether of a healthy organization.

Every teams live event is segmented into 3 types of users:
  1. Producers get to control what content (PowerPoint presentation) and what webcam feed (if any) gets shown to the attendees. Producers can be Presenters as well (I was a Presenter as well as a Producer).
  2. Presenters get to speak about the content.
  3. Attendees can only listen, and, if the meeting is configured for it, ask questions through the Q&A panel. Because the live event is recorded and buffered, attendees may be witnessing the content at different points in time, and not be in "real time".

To create a Teams Live Event
  1. Launch Teams (web or exe) and visit Calendar.
  2. New Live Event from the upper right corner UI
  3. Fill out the first page for the live event. Pick Presenters from the Invite presenters UI on the right. You can make people Producers here, which may be nice to have as a backup, but too many cooks...
    Press Next
  4. Fill out the second page. I prefer "Org-wide", but I think you can segment this where only specific people are attendees.
    I also like checking "Q&A" to enable attendees to send questions, and filling out a Support url,

    Press Schedule. Your Presenters and Producers that are not you will get the email invite.
  5. Click on the created Calendar invite in Teams. You'll see a "Get attendee link". Copy that and communicate that url to attendees by whatever means you want (outlook meeting, internal company social media post, cleverly crafted interpretive dance with QR codes, ...)


    as these urls are long & ugly, I really like using the "CTRL+K" insert link feature to add them to outlook or your internal company social media system, and to create some nice human readable display text. People like seeing something like chickens with pants | google vs a huge wall of url text that causes content to scroll off the bottom.
Done - you've now scheduled your event

Make sure to do "dry runs" of the live event with your other producers and presenters AND SOME VOLUNTEER TEST ATTENDEES, so you develop a good flow. Creating multiple live events leading up to the real deal is, as far as I know, free and easy to do. Practice makes perfect.

On the day of the Live Event

  1. You can either create a separate "green room" teams meeting for last minute coordination with the other producers and presenters, or you could probably use the live event as a means of coordination.

    As producers and presenters join the Teams Live Event, they can speak with each other, but attendees cannot hear them until they press the magic "Start Live" button.
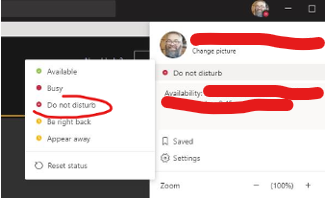
  2. Remove distractions. Mark yourself Do Not Disturb in Teams. Close outlook. Power down Alexa.

To start & run the Live Event
  1. The Producer should start the PowerPoint presentation. I'd recommend a multi monitor configuration, where you have monitors, from left to right of:
    1. Presenter View for slide deck - the one that shows presenter notes, the next slide coming up, etc.

    2. Teams Live Event view - this is where the Producer will send Presenters live, and control what content shows.

    3. Slide show view - this will be the content you send to the Live Event
      Control that monitor here:
    4. The Producer wants this monitor configuration because you'll be mousing back and forth to the Teams Live Event view and picking Presenters to place in Queue & to send Live. The less distance you have to traverse, the easier. Trust me.
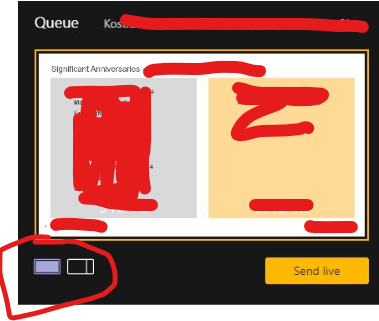
  2. The Producer makes a choice of displaying either just a presentation, or a presentation and a video feed by picking from this UI under the yellow "Queue" window.
  3. The Producer will share the presentation by picking "Share" in the lower right corner, and then choosing the Slide show (NOT the presenter view). Select the Content with your mouse in the yellow Queue window, and pick the Content of what you're sharing

    If you want to queue a video feed of a presenter, you can do the same. Click the right hand side video feed in the yellow Queue window, and then click a Presenter or Producer.
  4. Click Send live and then Start Live on the live event. You're live to your attendees!
  5. What shows on the right hand side window for the Live event is what attendees see.
  6. The Producer moves through the slide show, and places speakers and content in Queue, by clicking at the appropriate place on the left hand yellow Queue window and then clicking on Presenters or Producers below.

    Move a Presenter to the live event by Queue'ing them and then pressing "Send live"

    I'd recommend sticking with a single piece of shared Content for an entire live event. It's a bit awkward to stop content and reshare new content. 
  7. All Producers and Presenters have their audio playing on the live event, so MUTE YOURSELF IF YOU ARE NOT PRESENTING.

    Use the attendee chat to do coordination with presenters and producers. Watch that key clicks don't go in the audio feed (more muting!)
  8. If a Presenter has bad internet and wants to use a dial in number, that is an option.
  9. Somebody should monitor the Live event Q&A and field questions, promoting them from New to Published or Dismissed as appropriate.
  10. Lather, rinse, repeat 
  11. Press "End" to stop the Live Event. Once stopped, it cannot be restarted.
  12. High fives, you're done
After the Teams Live Event
  1. Visit the Teams Calendar event again to download a copy of the Recording (mp4, you can upload to microsoftstream.com), Q&A report, Attendee engagement report, etc.
  2. The attendee engagement report will have an entry for each attendee for each join, so if internet blocks some attendees & they drop, you'll see them join multiple times.
What could have gone better
  1. We wanted to have intro and exit music and some funny videos. Teams doesn't yet support routing PowerPoint audio as input to the Teams Live Event audio feed. I'm sure we could get some 3rd party software to create a fake audio input device that would "wrap" a microphone and audio out.

    Instead, the Producer (me!) leaned his head down next to the speakers so his microphone picked up the audio. For real.
  2. One of the Presenters kept losing webcam feed, so the Producer had to re-queue their webcam as it came back. Luckily, audio was not lost, so this was probably not noticed by anybody.
  3. As producer, seriously, watch the monitor configuration (details above). The less mouse gymnastics around queueing content and presenters, the better.

Tuesday, April 21, 2020

The "Lydia"


  1. Glass of ice
  2. 1 shot St-Germain
  3. 1+ tablespoon cardamom simple syrup
  4. top off with fizzy lemon water
  5. Ignore the butter in the background. You don't want that in your drink.
  6. garnish with lemon and the hopes of your ancestors
Called "The Lydia" after my neice, who is, unsurprisingly, named Lydia - her idea for cardamom simple syrup & elderflower as a combination.


Saturday, April 11, 2020

CBFT

Creme Brulee French Toast


Ingredients

  1. 1 stick of butter
  2. cup of brown sugar
  3. 1 baguette
  4. 5 eggs
  5. 1.5 cups half & half
  6. vanilla
  7. amaretto or some other fancy liqueur 
  8. salt
  9. cinnamon
Directions
  1. melt butter, dissolve in brown sugar, pour in baking dish
  2. cut crusts off of baguette (this is a PITA but really important. feed the crusts to your chickens)
  3. Slice into half inch slices and place over the brown sugar
  4. mix 
    1. eggs, 
    2. half & half, 
    3. vanilla, 
    4. tsp salt, 
    5. .5 tsp cinnamon
    6. glug of fancy liqueur
  5. pour over bread
  6. Cover, let set in a refrigerator overnight
  7. Bake 350 35-40m

This is 100% an Easter staple for us. While my wife sets an amazing table with multiple dishes, this is my single paltry contribution, but it is fairly popular. I've gotten a few requests for the recipe, so here it is.

Note: this was largely driven by the allrecipes recipe, although I've done this one enough that I was able to type this one out from memory with my own tweaks.

Thursday, April 9, 2020

Gin Drink With a Thousand Names


  1. 1 Unit of Malfy's Blood Orange Gin. Yum.
  2. 1-2 Tablespoons of simple syrup, infused with ginger & lemon.
  3. Top off with Aldi Belle Vie lemon soda water. Known in the Kostrzewa household as "lemon sad soda"
  4. Garnish with an overwhelming sense of optimism.
Crowdsourcing a name to this gin drink resulted in:
  1. The Snotty Biotch
  2. Ginger Maryanne Gilligan
  3. Scurvy no more
  4. The Headache
  5. The Ron-Draco Ship
  6. A Bloody Ginger Rogers
  7. Pink Passion
  8. Futile Breeze
  9. Three Hour Tour
  10. Heaven’s Stank 
My recommendation is that, like all things beautiful, it can be both every name and no name simultaneously.

Now, to deal with the fact that COVID-19 has taken all my gin away.

Tuesday, April 7, 2020

On the Theory and Practise of Hot Ham Water

At a venerable 50 years old, I attribute my longevity to two main pursuits: Daily-ish workouts in Wu style T'ai Chi Chuan, of which I am a registered disciple, and multi-day consumptions of a concoction that I call "Hot ham water".

Hot ham water is hot, but contains no ham. It's name derives from a single throwawy gag of an episode of Arrested Development. "So watery, yet there's a smack of ham to it!"

Making hot ham water is simple:

Ingredients

  1. A teapot
  2. Water
  3. A knuckle of ginger. Please support your local Asian market by purchasing from them - it'll be much cheaper. Dressing your ginger as a lobster is optional.


  4. A lemon. I care less where this is purchased.
  5. A device to heat the water. I use a kettle. Others use other things.
  6. (optional) Sweet osmanthus tea. I find the flavor pairings lovely, and I use this when I want an extra caffine boost beyond the 47,000 cups of coffee I drink each day.
Directions
  1. Heat water to a boil.
  2. Chop a thumb size of ginger into smaller bits.
  3. Slice lemon in half, and then quarter it.
  4. Ginger, quartered half-lemon, and optional tea goes into the teapot infuser (as a side note, it took me a while to figure out that was called an infuser. I did web search "teapot schematic". While not helpful, it was an interesting rabbit hole).
  5. Pour water over the good stuff.
  6. Drink in your favorite mug.

I will make about 4-5 pots of this throughout the day. When the ginger is less gingery, I'll throw the stuff away & start anew.

Special thanks to my many Indian friends & coworkers that extol the virtues of ginger. I often think of this as the "chicken soup" of India - a food that solves most physical and emotional problems. 

Peace to my original hot ham water custom designed mug


that was lost in Kalamazoo's own Lawson Ice arena while distracted by chaperoning a middle school party. I will see you at the crossroads, friend.

Monday, April 6, 2020

Vegetarian curry noodles


One of our daughters is originally from China and she is obsessed with noodles. My wife makes awesome miso kimchi noodles, that is a go-to.

As one of my favorite foods from pre-veg days was Singapore chow mei fun (Singapore style fried rice noodles with curry sauce & meat), I wanted to try to make something similar.

Making this is fairly effortless now, so I don't follow much of a recipe - it's mostly an excuse to "eat down" whatever vegetables are still good, but a little long in the tooth. I'll try to call out the important bits.

I'm also awful with sizing things. Pours are a "bloop", spices are a "blop". You know when you've done wrong.

Ingredients

  1. Dry rice noodles & water to cook said noodles. Maybe 2-3 blocks of noodles.
  2. Oil
    1. canola, vegetable - the cheap stuff - used for frying
    2. sesame oil - the expensive stuff - used for final dressing.
  3. 2 eggs
  4. Spices
    1. curry paste or powder
    2. cardamom powder
    3. salt
    4. pepper
  5. Chopped Vegetables
    1. Ginger (if you don't have ginger, you can substitute with spice powder. I also really like buying tube ginger when I find it. So much easier than mincing ginger).
    2. Garlic and/or Onion - your aromatics
    3. (Frequently) Mushrooms
    4. (I would use, but she's not a fan of) Carrots
    5. (ALWAYS) Cabbage, pref nappa. 
    6. (Sometimes) Zucchini
    7. (Frequently) Bell peppers
    8. Other veggies - sure! I've even thrown in some chopped avacado after the cooking is done. Make sure to salt it with a nice chunky salt.
  6. Sour liquid
    1. I like & use mirin a lot - it's a good, kind of sweet flavor, but sometimes will use cooking sake. Whatever my hand hits first in our "cooking supports" cupboard.
About that cabbage - I fell like cabbage gets such a bad rap, and it's delcious. Stays crunchy on a fry, I love the texture. Cabbage all the things!

Steps
  1. Get water boiling for noodles. Don't put your dry noodles in yet - they will cook in about 2m, and you want them slightly not done, so they can finish cooking with the good stuff below.
  2. Get your wok on med/high heat with a bloop of frying oil. Let it heat up. If you don't have a wok, a regular pan is fine, as long as it has sides so stirring veggies doesn't make a stove mess.
  3. Beat eggs with curry paste/powder, salt and pepper.
  4. Cook your eggs, but not completely. Cooking will happen super quick & they should a bit liquidy . Throw them right back in the container you used for beating.   
  5. If you need an extra bloop of frying oil, add it here.
  6. Add your ginger, garlic / onion
  7. Throw a little bit more curry paste / powder & cardamom on. Stir together for about 30s, so they cook but do not burn.
  8. Throw in your other chopped veggies. This being a stir fry implies that you will stir, while they fry.
  9. Salt & pepper the mix. Cook maybe 2-3m. It's an art, not a science.
  10. Remember the boiling water? You're going to want to throw in the noodles here.
  11. Add a bloop of the mirin or sake (or whatever sour liquid you pick). Cover the veggies & let them steam in it. 
  12. When the noodles are not quite done, pull them out & throw them on the wok & mix with the rest of the stuff.
  13. Remember the eggs? Throw them in now too.
  14. Stir. Fry, maybe another 2-3m
  15. Turn off the heat. dress with a little bit of the expensive sesame oil. Mix. 
  16. Salt to taste to get flavors to pop.
Enjoy!

Photos
Ignore the mess. Life is suffering and chaos

stir fry


nappa cabbage!

noodles, quick boil

steam veggies in cooking sake

final mix with egg